You wake up groggy. You drag yourself through coffee. You crash at 4 PM. You stare at the ceiling at 2 AM. It feels like a personal failure, like you just lack discipline. It isn’t. It’s a mechanical issue.
Your body runs on a circadian rhythm. It’s a 24-hour internal cycle. It doesn’t care about your deadlines or your Netflix queue. It wants to sync with the sun. When that sync breaks, you feel like garbage.
This isn’t just about “sleep hygiene.” It’s about biology. The science here is actually pretty straightforward, even if applying it is a pain. You have a master clock in your brain. It dictates when you feel alert and when you feel like a zombie. Most of us are fighting this clock every day and wondering why we’re losing.
Why Jet Lag Feels Different Going East
Travel exposes the flaws in this system beautifully. If you fly from New York to London, you lose hours. You land, it’s morning, but your body thinks it’s the middle of the night. This is “phase advancing.” It is notoriously difficult. You are asking your internal clock to speed up, to go to bed earlier than it wants to.
Go the other way—London to New York—and you gain hours. You stay up later. This is “phase delaying.” We are generally better at staying up late than going to bed early. It’s why that Sunday night insomnia before a Monday workday feels so impossible to beat. You’re trying to force a phase advance on a weekend. It’s cruel.
These rhythms affect more than just sleep. They regulate hormones, body temperature, and digestion. That afternoon slump? That’s not just a heavy lunch. That’s a dip in your circadian rhythm. It happens to almost everyone. Your body temperature drops slightly. Your brain sends out “sleep” signals. Fighting it with caffeine is a temporary fix that often borrows energy from later.
The Light Problem
Here is the main culprit: artificial light. For most of human history, the sun went down, and it got dark. We had fire, which is warm and dim. Then came LEDs. They are bright, and they are blue.
Blue light is the signal for “wake up.” It tells the suprachiasmatic nucleus—the master clock in the hypothalamus—that it is daytime. When you stare at your phone at 11 PM, you are essentially shouting at your brain that the sun is still high in the sky. Your brain suppresses melatonin, the hormone that prepares you for sleep. You feel alert. You scroll Instagram. You ruin your sleep pressure.
It’s annoying. I know. We like our screens. But if you are serious about fixing your sleep, you have to manage light. It’s the single most powerful “zeitgeber”—a time cue—that we have.
How to Actually Fix It
So, what do you do? You don’t need a fancy app. You don’t need to buy a $500 mattress. You need to manipulate your light exposure. Morning light is non-negotiable.
Get outside within 30 to 60 minutes of waking up. Even if it’s cloudy. Even for ten minutes. This light sets the timer for the night. It tells your brain, “Okay, this is morning. Start the clock.” If you get that light hit, your body will naturally start producing melatonin about 14 to 16 hours later. It’s that reliable. Darkness is a tool.
At night, dim the lights. An hour before bed, put the phone away. If you must use a computer, use software that reduces blue light, or wear goofy orange glasses. I know they look stupid. They work. You need to signal to your body that the day is over. Consistency beats everything.
This is the part people hate. You need to wake up at the same time every day. Yes, even on weekends. Sleeping in on Saturday confuses the clock. It’s like giving yourself mini-jet lag every week. If you stay up late on Friday, wake up at your normal time Saturday anyway. You can nap later if you have to, but keep the wake-up time solid. Melatonin is a signal, not a sledgehammer.
Supplements can help, but people misuse them. Melatonin isn’t a sleeping pill. It’s a hormonal signal. It tells the brain “it’s dark now.” Taking a massive dose won’t necessarily knock you out; it might just give you weird dreams or a groggy headache. Low doses (0.5mg to 3mg) taken a few hours before bed are more effective for shifting the rhythm than taking a high dose right when you want to sleep.
Stop Fighting Your Genetics
Some people are “larks.” They wake up at 5 AM, full of energy. Some people are “owls.” Their brains naturally want to sleep at 2 AM and wake up at 10 AM. This is genetic.
Society runs on a lark schedule. We tell owls they are lazy. They aren’t. Their internal clock is just set differently. If you are a night owl trying to force a 6 AM wake-up, you are fighting a losing battle against your DNA.
You can shift your rhythm, but only so much. A true night owl might become a “moderate” owl, but they will rarely become an early bird. Recognizing your chronotype saves you a lot of frustration. If you are an owl, try to negotiate a later start time with your boss. If you can’t, prioritize that morning light exposure to trick your body as much as possible.
The Reality Check
Fixing a broken sleep cycle takes time. You didn’t break it in a day. You won’t fix it in a day.
You will slip up. You will have a late night. You will doom-scroll at 2 AM. That’s fine. Don’t beat yourself up. Just get the light the next morning. Get back on the horse. The system is resilient. It wants to be in sync. You just have to give it the right signals.
Put the phone down. Turn off the lights. Trust the biology.
Let’s get one thing straight right out of the gate. When people hear “nuclear fusion,” they usually picture the cooling towers of a standard nuclear plant or the aftermath of Hiroshima. They assume it’s just the same scary technology, maybe dialed up a notch. That’s wrong.
It’s a fundamental misunderstanding of the physics. The nuclear plants we have today run on fission. They take heavy, unstable atoms like uranium or plutonium and smash them apart. It’s a violent splitting process that releases energy but leaves behind a mess of radioactive waste that stays dangerous for thousands of years. It’s messy, and frankly, it’s a bit crude.
Fusion is the opposite. Instead of breaking things, you’re forcing light atoms—usually isotopes of hydrogen—together. You’re mimicking what happens in the sun. When they fuse, they release energy that dwarfs what fission can produce, and the fuel is abundant. The waste issue? It’s nowhere near the same scale of nightmare. But here is the kicker: getting atoms to fuse is incredibly hard. They naturally hate each other. They are positively charged, so they repel like magnets pushed the wrong way. To get them to hug, you have to ignore their natural instincts and force the issue.
The Heat Problem
So, how do you force two atoms that hate each other to merge? You turn up the heat. I’m not talking about “oven hot” or even “forest fire hot.” We are talking temperatures that defy common sense.
To get fusion happening on Earth, you need to heat hydrogen isotopes to tens of millions of degrees. Sometimes hundreds of millions. At those temperatures, matter stops behaving like gas or liquid; it becomes plasma. It’s a soup of charged particles where electrons are stripped away from nuclei.
This is the first major hurdle. There is no material on Earth that can touch that stuff. If you tried to put it in a steel container, the container wouldn’t just melt; it would literally vaporize. So, we have to trap it using magnetic fields or惯性 confinement. It’s like trying to hold a glob of jelly in mid-air using only rubber bands. The energy input required to sustain these temperatures has historically been the dealbreaker. For a long time, we put more energy into keeping the reaction going than we got out of it. It’s like spending $100 to buy a $5 gift card.
We Learned from the Bomb
We actually proved fusion works back in the 1950s. But we did it the scary way. The hydrogen bomb—technically a thermonuclear weapon—uses fusion. It’s a terrifying piece of engineering.
The design is clever in a horrifying way. It uses a “two-bomb” structure. You start with a standard fission atomic bomb (the uranium or plutonium kind). You detonate that first. The energy from that explosion isn’t the main event; it’s the match. It compresses and heats a secondary fuel core containing isotopes like tritium, deuterium, or lithium deuteride.
When that primary blast hits, it creates the conditions we talked about—temperatures soaring to around 100 million degrees. That triggers the fusion fuel. The result is a thermonuclear explosion that is hundreds of times more powerful than the bomb that destroyed Hiroshima.
So, we knew the physics worked in 1952. We knew we could release this energy. But doing it in a bomb is easy because you don’t care about control. You don’t care if the machine survives. You just want a bang. Doing it in a power plant? That requires restraint. You need to keep that star-like reaction contained in a box, not blowing up a city.
The 1950s Dream vs. Reality
In the 1950s, scientists were optimistic. They saw the power of the H-bomb and thought, “We can tame this.” They believed that peaceful, controlled fusion was just around the corner. It was the golden age of “atoms for peace.”
But they ran into a wall. They didn’t actually understand the complexity of the plasma they were trying to contain. They thought they could just wrap a magnetic field around some hot gas and electricity would flow out the other end. They were wrong. The plasma is unstable; it writhes and twists like a living animal, looking for any weak point in the magnetic cage to escape through.
For decades, fusion became a running joke in the physics community. It was always “30 years away.” The joke was that it would always be 30 years away, no matter what year it was. The public got tired of the hype. Billions were spent, and for a long time, the return on investment was basically zero in terms of usable power.
Why It Feels Different Now
So, why am I writing about “Why Fusion Energy Might Finally Arrive Soon” if we’ve been failing for 70 years? What changed?
It’s not just one thing. It’s a shift from “pure science” to “engineering reality.” In the past, we were exploring the unknown. We didn’t know if certain magnetic configurations would work. Now, we have supercomputers that can model the plasma behavior before we even build the machine. We aren’t guessing as much.
We are also seeing a shift in materials science. The magnets we use today—specifically high-temperature superconductors—are leagues ahead of the copper coils of the 1950s. Stronger magnets mean we can squeeze the plasma tighter, making the reaction more efficient with a smaller machine.
Private companies have entered the chat, too. For a long time, this was a government-only game (think ITER, the massive international project). But now, startups are trying different approaches. Some are using the “two-stage” logic of the hydrogen bomb but replacing the fission trigger with massive lasers. Others are using simpler magnetic designs that are cheaper to build.
I’m not saying we should go out and buy fusion-powered cars next week. There is still a massive gap between “net energy gain” in a lab and “consistent electricity on the grid.” The engineering challenges—like finding materials that can survive the neutron bombardment inside the reactor—are brutal.
But the difference today is that the core scientific questions—the “can this actually work?” questions—have largely been answered. We know the hydrogen bomb works. We know the sun works. We are finally getting to the point where we can replicate that process without needing to blow something up or live inside a star.
The timeline is still fuzzy. It might be another decade. It might be two. But for the first time, the skepticism is being replaced by a cautious, data-driven optimism. We aren’t waiting for a miracle anymore; we’re just waiting for the engineers to finish the job.
I’ll be honest. The term “quantum computing” gets thrown around so much that it has started to lose all meaning. It sounds like something out of a sci-fi movie, usually involving a laser beam and a lot of dry ice. If you ask five different experts to define it, you might get five different answers, all involving math that makes your brain hurt.
Let’s strip away the buzzwords. At its core, quantum computing is a new way of processing information. It’s not just a faster version of what we have now. It’s a completely different approach. Think of it like this: classical computing is the lightbulb. Quantum computing is the laser. They both deal with light, but the rules of the game are totally different.
This field sits at the intersection of computer science, engineering, and physics. specifically the kind of physics that deals with the smallest, coldest things in the universe. It’s weird, it’s counter-intuitive, and frankly, it’s a little bit scary how powerful it could be.
The Weird Rules of Tiny Things
To understand how these machines work, you have to accept that the universe operates differently at the atomic scale. We are used to things behaving logically. If you drop a glass, it breaks. It doesn’t stay broken and unbroken at the same time.
But in the quantum world, that logic doesn’t apply. This is the realm of quantum mechanics. It is the operating system of the cosmos, running in the background since the Big Bang, and we are just now figuring out how to hack it.
Quantum computing doesn’t ignore these laws; it uses them. It exploits phenomena like superposition and entanglement to do things that standard computers look at and just give up. It’s not magic, even though it feels like it. It’s just math that we haven’t had the hardware to run until now.
Bits vs. Qubits: The Coin Flip
Here is the part where most explanations lose people. They start talking about vectors and probability amplitudes. Let’s skip that.
Your laptop, your phone, even the supercomputer at a university research lab, all work on the same fundamental unit: the bit. A bit is a switch. It’s either on or off. 1 or 0. That’s it. Everything you see on your screen—this text, a video, a spreadsheet—is just billions of these switches flipping in a specific order.
Quantum computers use qubits. A qubit is also a switch, but it has a superpower. Thanks to something called superposition, a qubit doesn’t have to be just 1 or just 0. It can be both at the same time.
Imagine flipping a coin. A classical bit is the coin after it lands—heads or tails. A qubit is the coin while it’s spinning in the air. Is it heads? Is it tails? It’s kind of both, holding the potential for either outcome until you catch it.
This doesn’t sound like a big deal until you chain them together. Two classical bits can be in one of four states: 00, 01, 10, or 11. But they can only be one of those at any given moment. Two qubits can be all four states simultaneously. Add more qubits, and the possibilities explode exponentially. This allows the machine to explore a vast number of solutions at once, rather than checking them one by one.
Why Speed Matters (And Why It Doesn’t)
You hear a lot about speed. “Quantum computers are millions of times faster!” It’s a headline that gets clicks, but it’s misleading. If you just want to browse the web or write an email, a quantum computer would probably be slower than your phone. The overhead needed to maintain those quantum states is massive.
The speed difference only shows up for specific problems. These are the “needle in a haystack” problems. A classical computer has to check every piece of straw to find the needle. A quantum computer can look at the whole haystack at once.
We are talking about calculations that would take a traditional supercomputer thousands of years to finish. A quantum computer might solve them in minutes or hours. That’s not just an upgrade; that’s a paradigm shift. We are moving from counting on our fingers to something that feels closer to prophecy.
The “Cold” Problem
Here is the reality check. This technology is incredibly fragile.
To get a qubit to maintain that “spinning coin” state of superposition, you need to isolate it perfectly. Any vibration, any heat, even a stray photon can mess it up. This is called “decoherence,” and it is the enemy of quantum computing.
Because of this, quantum computers have to be kept ridiculously cold. We are talking about temperatures colder than outer space, hovering just above absolute zero. This requires massive, complex refrigeration systems that look like something out of a steampunk novel.
Right now, these machines are prone to errors. They are brilliant, but they are also clumsy. A significant amount of the computing power has to be used just to correct the mistakes the machine makes while it’s thinking. We are essentially in the “vacuum tube” era of quantum computing. It’s impressive, but it’s not ready for your living room yet.
It’s a Sidekick, Not a Replacement
There is a fear that quantum computers will make our current tech obsolete. That’s not going to happen.
Classic computers are great at the things we do every day: accounting, streaming video, running spreadsheets. Quantum computers are specialized tools. They are like a Formula 1 car. It’s incredible for what it does, but you wouldn’t drive it to the grocery store.
The future is likely a hybrid system. You have your standard computer doing the heavy lifting for normal tasks. When it hits a wall—a problem too complex to solve—it sends the data to the quantum processor. The quantum unit crunches the numbers using its probabilistic magic and sends the answer back. They work together. One is the brain; the other is the intuition.
Breaking the Internet (Literally)
Let’s talk about the scary stuff. One of the most famous applications of quantum computing is in security.
Almost all the security on the internet—your banking, your passwords, your private messages—relies on encryption. Most encryption is based on math that is easy to do in one direction but incredibly hard to reverse. It’s like mixing paint. It’s easy to mix blue and yellow to get green. It’s almost impossible to separate that green back into pure blue and yellow.
Classical computers can’t reverse this mix in any reasonable amount of time. Quantum computers, using specific algorithms like Shor’s algorithm, theoretically can. They could factor massive numbers instantly, unlocking the digital safe.
This is known as the “harvest now, decrypt later” threat. Hackers could be stealing encrypted data today, storing it, and waiting for quantum computers to mature so they can unlock it. It’s a ticking time bomb for cybersecurity.
Saving Lives with Molecules
It’s not all doom and gloom. The potential for good is staggering.
Consider drug discovery. To create a new medicine, you need to understand how molecules interact. A molecule is a complex system of atoms bonded together. Simulating these interactions on a classical computer is insanely hard. Even a simple caffeine molecule is too complex for today’s supercomputers to model perfectly.
Quantum computers operate on the same physics as molecules. They don’t have to simulate the physics; they are the physics. This means they could model new drugs with pinpoint accuracy, cutting down development time from years to months. We could design materials that are lighter, stronger, or better at conducting electricity.
It could revolutionize batteries. Imagine an electric car battery that charges in five minutes and lasts for a thousand miles. That might be possible if we can use quantum computing to design the chemistry for it.
The Hype vs. Reality
We are in a weird spot right now. The technology is advancing faster than expected, but practical applications are still a few years away.
Companies are racing to build “quantum advantage”—the moment when a quantum computer actually solves a useful problem faster than a classical one. We’ve seen claims of “quantum supremacy,” where a computer solved a useless math problem faster than a supercomputer. That’s a cool party trick, but it doesn’t pay the bills.
The next decade is going to be messy. There will be breakthroughs, and there will be setbacks. The hardware will get better, and the error rates will go down. We will move from experimental physics to practical engineering.
If you are trying to learn this, don’t get bogged down in the tensor calculus. Focus on the concepts. Understand that the world is probabilistic, not deterministic. Accept that sometimes the best way to solve a problem is to stop looking for a straight line and start looking at all the curves at once.
We are standing on the edge of a cliff. It’s terrifying, but the view is incredible.
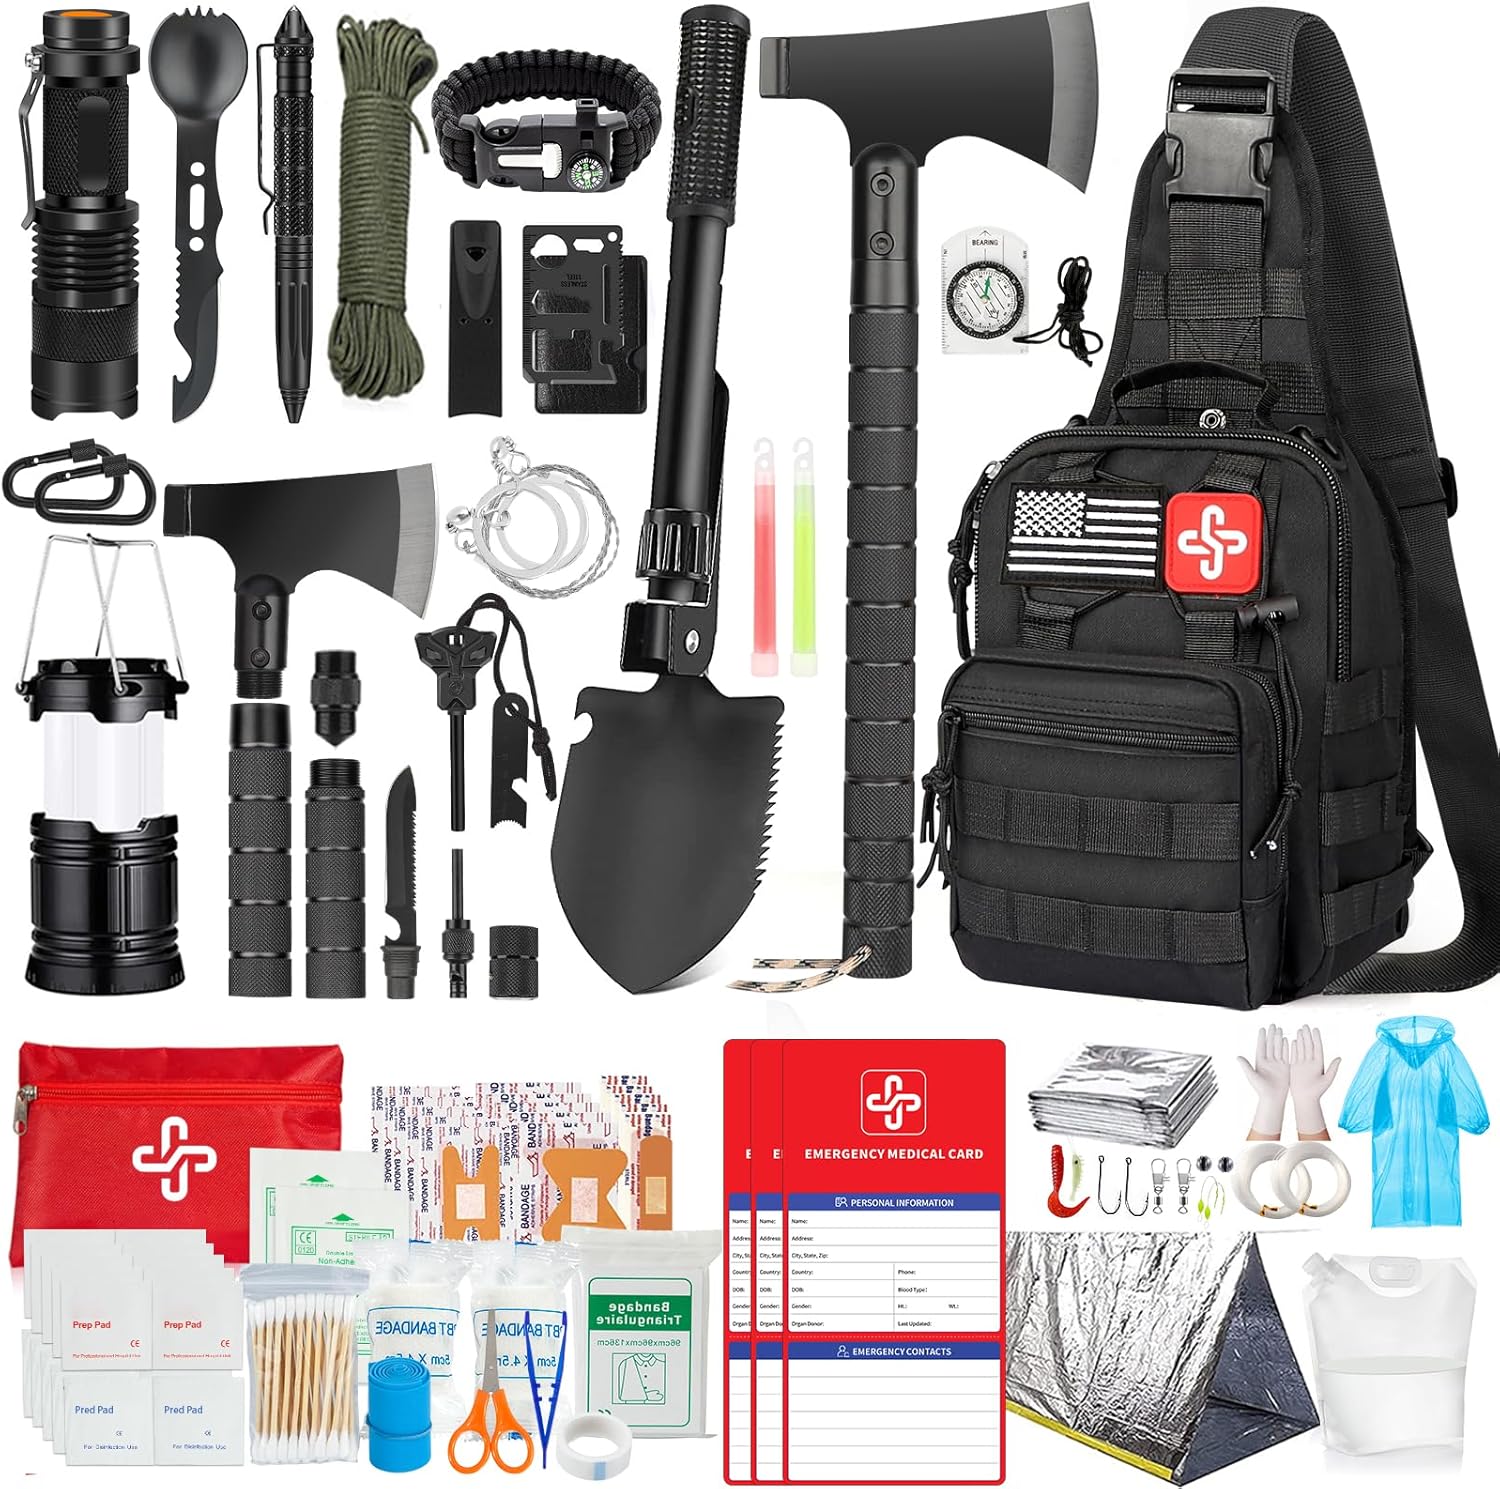
Summary: A detailed checklist of compact survival tools every camper and backpacker should carry. We cover the 10 essentials system, explain why each item matters, provide weight-conscious recommendations, and help you build a survival kit that could save your life in the backcountry.
Why Every Camper Needs a Survival Tools Checklist
The wilderness does not forgive lack of preparation. Every year, search and rescue teams across North America respond to thousands of calls from hikers and campers who found themselves in unexpected survival situations — sudden weather changes, navigation errors, equipment failures, or medical emergencies that turned a routine outing into a life-threatening ordeal.
The difference between a manageable inconvenience and a genuine emergency often comes down to the compact survival tools you carry in your pack. A well-curated survival kit weighing under a pound can address the most critical threats you might face in the backcountry: exposure, dehydration, inability to signal for help, and lack of navigation capability.
This checklist is built around the modern 10 Essentials system developed by mountaineering organizations, adapted specifically for compact, ultralight implementation. Whether you are a day hiker, weekend backpacker, or thru-hiking veteran, these items should be in your pack on every trip.
The 10 Essential Categories for Wilderness Survival
The 10 Essentials framework has guided outdoor preparedness since the 1930s. Originally a list of specific items, it has evolved into a systems-based approach where each category addresses a critical survival need. Here is how to build your compact survival toolkit around each one.
1. Navigation Tools
GPS devices and phone apps are convenient, but batteries die, screens crack, and satellite signals get blocked by terrain. A liquid-filled baseplate compass and a waterproof topographic map of your area weigh under 3 ounces combined and never need charging. Learn basic compass navigation before you need it — the middle of a whiteout is not the time for a tutorial.
For extended backcountry trips, consider adding a personal locator beacon (PLB) or satellite messenger. These devices can transmit your GPS coordinates to search and rescue services even in areas with zero cell coverage. At 3-5 ounces, this is potentially life-saving weight.
2. Fire Starting System
Fire addresses multiple survival priorities simultaneously: warmth, water purification, signaling, morale, and food preparation. Your fire kit should include at least two independent ignition methods. A ferrocerium rod is the most reliable primary fire starter for backcountry use because it works when wet, at any altitude, and in any temperature.
Pair your ferro rod with waterproof tinder that ignites easily and burns long enough to catch larger kindling. Commercial tinder pods, petroleum-soaked cotton balls, or fatwood shavings stored in a waterproof container are all excellent options. The Compact Survival Kit Pro includes a 4-inch ferro rod rated for 15,000+ strikes along with 4 waterproof tinder pods — enough fire-starting capability for dozens of emergency fires.
Carry a backup lighter as your secondary ignition source. A standard BIC lighter weighs under an ounce and provides thousands of lights. Store it in a waterproof bag to prevent accidental soaking.
3. Emergency Shelter
Hypothermia kills faster than dehydration or starvation. An emergency shelter can make the critical difference when you are forced to spend an unplanned night outdoors. The minimum viable shelter is an emergency Mylar blanket — they weigh about 2 ounces, fold to the size of a deck of cards, and reflect up to 90% of your body heat back to you.
For better protection, upgrade to an emergency bivy sack (4-6 oz) which fully encloses your body and provides superior wind and moisture protection compared to a flat blanket. If weight allows, carry a lightweight tarp (8-12 oz) and 50 feet of paracord. A simple A-frame tarp shelter takes 5 minutes to set up and provides excellent protection from rain, wind, and ground moisture.
4. Signaling Devices
When you need rescue, the ability to signal your location to search parties is critical. A 120 dB emergency whistle is the baseline — it requires no batteries, works in any weather, and carries sound over a mile in open terrain. Three short blasts is the universal distress signal.
A signal mirror with a sighting hole can flash reflected sunlight to aircraft up to 10 miles away in clear conditions. It weighs about 1 ounce and serves as a secondary signaling method during daylight hours. At night, a bright headlamp or mini flashlight with a strobe function serves the same purpose.
5. Cutting Tool
A reliable cutting tool is arguably the single most versatile survival item you can carry. It processes firewood, prepares food, cuts cordage, constructs shelter, and performs dozens of camp tasks. For most backpackers, a quality multi-tool provides the best balance of cutting capability and additional tool functions in a single compact package.
Look for a multi-tool with a locking blade made from quality steel (420HC or better), pliers, a small saw blade, and at minimum a flat-head screwdriver. The weight penalty of a multi-tool over a standalone knife is typically 2-3 ounces, but the added functionality is worth every gram in a survival scenario.
6. First Aid Kit
Pre-assembled first aid kits often contain items you will never use while missing things you actually need. Build or customize your own kit based on your specific activities and medical needs. The essential items for most backcountry trips include adhesive bandages in multiple sizes, butterfly wound closures, antiseptic wipes, medical tape, pain relievers (ibuprofen and acetaminophen), antihistamines, moleskin for blisters, and any personal prescription medications.
Store everything in a small waterproof bag and check expiration dates before every trip season. Take a wilderness first aid course — knowing how to use your kit is more important than what is in it.
7. Water Purification
Dehydration degrades your physical and mental capabilities faster than most people realize. In a survival situation, you need the ability to make water from natural sources safe to drink. A compact water filter (such as a squeeze filter at 2-3 oz) handles most biological contaminants. Backup chemical purification tablets (chlorine dioxide) weigh almost nothing and treat water in 30 minutes.
If you have fire capability and a metal cooking pot, boiling water for one minute at sea level (three minutes above 6,500 feet) kills all disease-causing organisms. This is why carrying a lightweight metal pot is dual-purpose — it is both cookware and a water purification vessel.
8. Illumination
A reliable light source is essential for nighttime navigation, shelter setup in the dark, signaling, and maintaining morale during unplanned bivouacs. A compact headlamp is the best option because it keeps your hands free for other tasks. Choose one with at least 150 lumens on high and 15+ hours of runtime on low.
Always carry spare batteries or ensure your headlamp has a rechargeable battery with sufficient charge for your trip duration plus an emergency reserve. A micro flashlight (under 1 oz) makes an excellent backup light source.
9. Sun and Insect Protection
Sunburn and insect-borne illness can turn from minor annoyances to serious health threats in a survival scenario. Carry broad-spectrum SPF 50+ sunscreen and insect repellent appropriate for your region. In tick-heavy areas, clothing pre-treated with permethrin provides an additional layer of protection. A lightweight sun hat and sunglasses protect against snow blindness at altitude and reduce sun exposure during extended outdoor stays.
10. Emergency Food
Even on a day hike, carry enough calorie-dense food to sustain you for an unexpected 24 hours. Energy bars, trail mix, nut butter packets, and jerky provide high calories per ounce and require no cooking. For extended trips, your regular food supply should include a one-day surplus beyond your planned itinerary.
In a true survival situation, your immediate priorities are shelter, water, and signaling — not food. The human body can survive weeks without food but only hours in severe cold without shelter and only days without water. Allocate your energy and resources accordingly.
Complete Compact Survival Checklist
Category
Essential Item
Approx. Weight
Priority
Navigation
Liquid-filled compass
1.0 oz
Critical
Navigation
Waterproof area map
1.5 oz
Critical
Fire
Ferro rod + striker
1.5 oz
Critical
Fire
Waterproof tinder (4 pods)
0.8 oz
Critical
Fire
Backup lighter
0.8 oz
High
Shelter
Emergency Mylar blanket
2.0 oz
Critical
Signaling
Emergency whistle (120 dB)
0.5 oz
Critical
Signaling
Signal mirror
1.0 oz
High
Cutting
Multi-tool (locking blade)
5.0 oz
Critical
First Aid
Custom first aid kit
3.0 oz
Critical
Water
Purification tablets
0.5 oz
High
Light
Mini flashlight + batteries
1.5 oz
High
Cordage
550 paracord (10 ft)
1.0 oz
High
Misc
Waterproof notepad + pencil
0.5 oz
Medium
Total estimated weight: approximately 20.6 oz (1.3 lbs)
If you prefer a pre-assembled solution that covers most of these categories in a single package, our Compact Survival Kit Pro includes 15 of these essential items in a MOLLE-compatible waterproof case at just 12.3 oz.
Building Your Kit: Assembly Tips
Test everything before you need it. Practice starting a fire with your ferro rod in your backyard. Verify your compass works by cross-referencing it with a known landmark. Check that your flashlight batteries are charged. Familiarity with your gear under calm conditions builds the muscle memory you need when stress and adrenaline are compromising your fine motor skills.
Store your survival kit as a single module. Keep all items in one dedicated pouch or bag that lives in your pack at all times. This prevents the common mistake of forgetting individual items when switching packs or preparing for different trip types. The kit should be the last thing you consider removing and the first thing you confirm is packed.
Inspect and rotate seasonally. Check expiration dates on first aid supplies, tinder pods, and food items at the start of each hiking season. Replace batteries, sharpen blades, and test all mechanical components. This 15-minute maintenance routine ensures your kit is always ready when you need it.
When to Upgrade Your Survival Kit
As your backcountry experience grows, your survival kit should evolve with your skills and the complexity of your trips. Beginners benefit from pre-assembled kits that cover the basics without requiring extensive gear knowledge. Intermediate hikers should customize their kit based on specific regional hazards — bear country requires different preparations than desert hiking.
Advanced backcountry travelers often carry lighter, more specialized tools because their skills compensate for some gear redundancy. However, the core essentials — navigation, fire, shelter, signaling — should never be eliminated regardless of experience level.
Frequently Asked Questions
What is the single most important survival tool to carry?
If forced to choose only one tool, most survival experts recommend a quality multi-tool with a locking knife blade. A cutting tool enables you to build shelter, process firewood, prepare food, create signaling devices, and perform first aid. However, we strongly recommend never limiting yourself to a single item — the whole point of a survival kit is redundancy across critical categories.
How heavy should a survival kit be for day hiking?
A well-curated day hiking survival kit should weigh between 12 and 20 ounces, depending on regional hazards and personal medical needs. This is less than the weight of a full water bottle. Pre-assembled kits like our Compact Survival Kit Pro at 12.3 oz represent the lower end of this range while still covering all essential survival categories.
Can a smartphone replace dedicated navigation tools in a survival kit?
A smartphone is a useful supplementary navigation tool, but it should never be your only one. Phones have limited battery life, fragile screens, and can lose satellite reception in dense forest or canyon terrain. A liquid-filled compass and waterproof map work in all conditions, never need charging, and weigh a combined 2.5 ounces. Carry both digital and analog navigation.
Do I need a survival kit if I am only going on a short day hike?
Yes. The majority of wilderness rescues involve day hikers, not backpackers. Day hikers tend to carry less gear, underestimate trail difficulty, and are less prepared for unexpected weather or navigation errors. A compact survival kit weighing under a pound provides critical insurance against the unexpected, regardless of your planned trip duration.
How often should I replace items in my survival kit?
Inspect your survival kit at the start of each hiking season. Replace items with expiration dates (first aid supplies, chemical water purification tablets, food items) annually or as needed. Test batteries, sharpen cutting tools, and verify all mechanical components function correctly. Ferro rods and metal tools last indefinitely with proper care.
Summary: A comprehensive guide to selecting ultralight backpacking cookware. We compare titanium, aluminum, and stainless steel options, break down essential features, and recommend the best compact cooking systems for thru-hikers and weekend backpackers alike.
Why Your Choice of Backpacking Cookware Matters
When you are carrying everything on your back for days or weeks at a time, every ounce demands justification. Cookware sits at a critical intersection of weight, durability, and daily usefulness — you will use it at least twice a day on most trips. The wrong cookware choice can mean unnecessary pack weight, frustrating cooking experiences, or gear failure when you need a hot meal most.
Ultralight backpacking cookware has evolved dramatically over the past decade. Modern materials and manufacturing techniques have produced cooking systems that weigh under 6 ounces while maintaining the durability needed for hundreds of trail meals. Understanding the tradeoffs between different materials, designs, and feature sets is essential for making an informed purchase that aligns with your specific hiking style and cooking preferences.
This guide walks through everything you need to know about choosing ultralight cookware for backpacking, from material science to practical field considerations that only become apparent after miles on the trail.
Material Comparison: Titanium vs. Aluminum vs. Stainless Steel
The material your cookware is made from determines its weight, heat distribution, durability, and price. Each material presents distinct tradeoffs that suit different hiking philosophies.
Titanium: The Ultralight Gold Standard
Titanium has become the material of choice for serious ultralight backpackers and thru-hikers. Grade 1 pure titanium offers an exceptional strength-to-weight ratio — it is as strong as steel at roughly 45% less weight. A typical titanium pot weighs between 3.5 and 5.5 ounces depending on capacity, compared to 6-8 ounces for an equivalent aluminum pot.
Beyond weight savings, titanium is completely non-reactive. Unlike aluminum, which can impart a metallic taste to acidic foods like tomato sauce or citrus-based drinks, titanium maintains flavor purity regardless of what you cook. It also resists corrosion indefinitely, meaning your titanium cookware will outlast every other piece of gear in your pack.
The primary drawback of titanium is poor heat distribution. Titanium conducts heat at roughly 1/10th the rate of aluminum, creating hot spots directly above the flame. This is less of an issue for boiling water — the primary cooking method for most backpackers — but makes simmering and frying more challenging. Our Ultralight Titanium Cook Set addresses this with a slightly thicker base that helps distribute heat more evenly across the cooking surface.
Aluminum: The Budget-Friendly Lightweight Option
Hard-anodized aluminum remains the most popular cookware material for backpackers. It offers excellent heat distribution — approximately 10 times better than titanium — which makes it superior for actual cooking rather than just boiling water. Aluminum cookware is also significantly less expensive than titanium, often costing 40-60% less for comparable products.
Modern hard-anodized aluminum has largely addressed the reactivity concerns that plagued earlier aluminum cookware. The anodization process creates a hard oxide layer that prevents direct metal contact with food. However, this coating can wear over time, especially with metal utensils, and once compromised, the underlying aluminum is again exposed to food contact.
Weight-wise, aluminum is heavier than titanium but lighter than stainless steel. Expect a typical aluminum pot to weigh 1.5 to 2 times more than an equivalent titanium model. For backpackers who prioritize cooking versatility over absolute minimum weight, aluminum represents an excellent compromise.
Stainless Steel: Durability Above All
Stainless steel cookware is the heaviest option but offers unmatched durability and the most familiar cooking experience. It distributes heat well, resists scratching and denting, and works on any heat source including induction. For car camping or base camp situations where weight is not a primary concern, stainless steel is hard to beat.
For backpacking, stainless steel is generally reserved for group cooking setups where the weight penalty is distributed across multiple people, or for bushcraft-style outings where durability over an open fire is the top priority.
Material Comparison Table
Feature
Titanium
Hard-Anodized Aluminum
Stainless Steel
Weight (750ml pot)
3.5–5.5 oz
5.5–8 oz
9–14 oz
Heat Distribution
Poor
Excellent
Good
Durability
Excellent
Good
Excellent
Taste Neutrality
100% neutral
Good (when coating intact)
Good
Corrosion Resistance
Excellent
Good
Good
Price (750ml pot)
$50–$100
$20–$50
$25–$60
Best For
Ultralight/thru-hiking
General backpacking
Car camping/groups
Essential Features to Look For
Capacity and Volume
For solo backpackers, a 600-750 ml pot is the sweet spot. This capacity handles boiling water for a single freeze-dried meal (typically requiring 500 ml) with room left for coffee or soup. If you prefer cooking for two or want extra volume for pasta or rice dishes, step up to a 900-1100 ml pot.
Many ultralight hikers find that a single pot in the 700-750 ml range covers all their cooking needs when paired with a separate insulated mug for beverages. This minimalist approach keeps pack weight low while maintaining cooking flexibility.
Handle Design and Stability
Foldable handles are standard on backpacking cookware and serve the dual purpose of reducing packed size and preventing burns. Look for handles with a positive locking mechanism — bail-wire handles that simply fold against the pot body can unlock during cooking, creating a spill hazard with boiling water.
The best handles feature silicone or rubber grip sections for heat insulation. Metal handles conduct heat rapidly and require a separate pot gripper or bandana to handle safely after cooking. Some designs use a removable pot gripper instead of integrated handles, which saves a few grams but adds complexity to the cooking process.
Lid Functionality
A good lid is not optional for efficient cooking. Lids reduce boil times by 20-30%, which directly translates to fuel savings on extended trips. Strainer holes in the lid allow you to drain pasta and rice without a separate colander. Some lids double as a small frying pan or plate, maximizing the utility of every component.
Nesting and Packed Size
The best ultralight cookware systems nest together efficiently, with cups fitting inside pots and lids clicking securely onto the top. Many hikers store their stove canister inside the pot as well, creating a single compact cooking module. Measurement markings inside the pot eliminate the need for a separate measuring cup, further reducing your kit list.
Stove Compatibility Considerations
Your cookware must work with your chosen stove system. Canister stoves with integrated pot supports accommodate virtually any flat-bottomed cookware, but some ultralight alcohol stoves and wood-burning stoves have specific pot diameter requirements. Check that your pot diameter matches or exceeds your stove’s support width.
Integrated stove systems like the Jetboil and MSR Reactor use proprietary cookware with heat exchangers bonded to the pot bottom. While these systems offer exceptional fuel efficiency and fast boil times, they lock you into a single-brand ecosystem. Standalone cookware with universal compatibility provides more flexibility and is easier to replace or upgrade piece by piece.
Cooking Technique Tips for Ultralight Cookware
Once you have selected your cookware, maximizing its performance requires adapting your cooking techniques to the material’s characteristics.
For titanium: Use lower flame settings to minimize hot spots. Stirring frequently prevents food from scorching on the bottom. For anything beyond boiling water, consider using a heat diffuser plate (available at under 1 oz) between the flame and pot.
For all materials: Always use a lid when heating water — it reduces boil time by 20-30% and saves fuel. Pre-soak dehydrated meals in cold water for 15-20 minutes before heating to reduce the total energy needed. On windy days, use a windscreen to prevent heat loss and protect your flame.
Cleaning on the trail: Boil a small amount of water in your pot immediately after eating to loosen residue. This is far easier than scrubbing dried food later and uses less water from your supply. A small piece of natural sponge weighing under 0.5 oz makes trail cleaning significantly easier.
Our Top Recommendation
After extensive field testing across multiple seasons and trail conditions, we consistently recommend the CampEssentials Ultralight Titanium Cook Set as the best overall value in ultralight backpacking cookware. At 5.8 oz for a complete 4-piece system (750 ml pot, lid with strainer, 450 ml cup, and mesh carry bag), it delivers titanium-grade performance at a competitive price point.
The combination of Grade 1 pure titanium, well-designed foldable handles, and a practical nesting configuration makes this our go-to recommendation for both thru-hikers looking to minimize weight and weekend backpackers seeking a reliable cooking setup that will last for years. View the complete product details and specifications here.
Frequently Asked Questions
What is the lightest cookware material for backpacking?
Titanium is the lightest practical cookware material for backpacking. A typical 750ml titanium pot weighs 3.5 to 5.5 ounces, which is approximately 45% lighter than a comparable stainless steel pot and 30-40% lighter than aluminum. Grade 1 pure titanium offers the best weight-to-strength ratio of any cookware material available.
Can you actually cook meals in ultralight cookware, or is it just for boiling water?
You can absolutely cook full meals in ultralight cookware, though the experience varies by material. Aluminum cookware distributes heat evenly enough for simmering, sauteing, and even basic frying. Titanium is best suited for boiling water and simple reheating due to hot spots, but with lower flame settings and frequent stirring, you can prepare more complex meals as well.
How much fuel does using a lid save when boiling water?
Using a lid when boiling water reduces boil time by 20 to 30 percent, which directly corresponds to a 20-30% fuel savings. Over a week-long backpacking trip where you boil water 2-3 times daily, this savings can mean carrying one fewer fuel canister, saving both weight and pack space.
Is titanium cookware worth the higher price compared to aluminum?
For dedicated backpackers who value weight savings and long-term durability, titanium cookware is worth the investment. The weight savings of 2-4 ounces per piece may seem small in isolation, but across an entire ultralight kit, these savings compound significantly. Titanium also lasts indefinitely with proper care, whereas aluminum coatings can degrade over time.
What size pot should I get for solo backpacking?
For solo backpacking, a 600 to 750 ml pot is ideal. This capacity accommodates boiling water for a single freeze-dried meal (typically 500 ml) with room for coffee or soup. If you frequently cook for two people or prefer larger meals, consider stepping up to a 900-1100 ml pot, though this adds 1-2 ounces of weight.